An ESP32 Bluetooth proxy is useful, but it normally sits quietly in a corner with no indication that it is working. I wanted something more practical: a Home Assistant proxy that also shows useful information on a small OLED screen.
That idea became HA Proxy Panel, an open source ESPHome project built around an ESP32 D1 Mini and a 1.29-inch OLED. It extends Bluetooth coverage for Home Assistant while displaying temperature, humidity, connection state, Wi-Fi strength, IP address, and uptime. I also designed a compact two-part enclosure so the finished device can sit neatly on a desk or shelf.
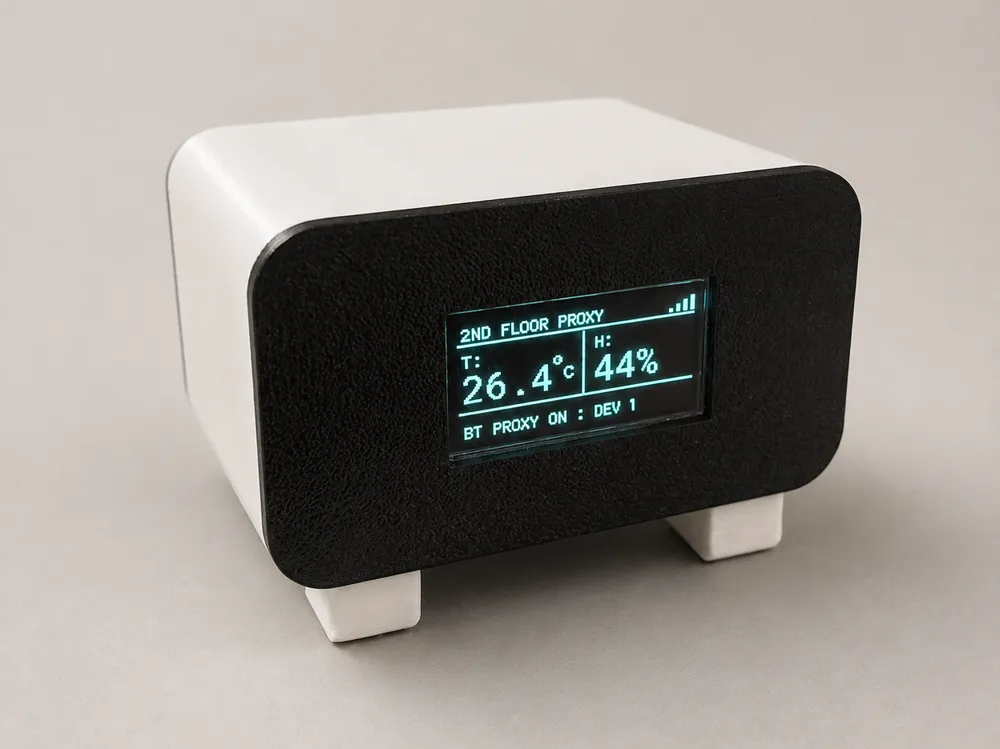
What this ESP32 Bluetooth proxy does
The ESP32 runs ESPHome and acts as an active Bluetooth proxy. Nearby Bluetooth Low Energy devices can communicate with Home Assistant through the proxy. This helps when sensors are too far from the Home Assistant host or when walls weaken their signal.
In addition, the OLED makes the device useful even when you are not troubleshooting Bluetooth. It can read two selected Home Assistant entities and present their values locally. I use temperature and humidity sensors, but you can point the configuration at any compatible numeric entities.
- Active ESPHome Bluetooth proxy for Home Assistant
- Temperature and humidity from selected Home Assistant entities
- Climate, Temperature, Humidity, and Proxy Status display modes
- Normal or 180-degree display rotation
- Wi-Fi signal, IP address, uptime, and connection diagnostics
- Persistent display settings that survive restarts
- Encrypted Home Assistant API
- Password-protected wireless firmware updates
- Captive portal fallback when the configured Wi-Fi network is unavailable
For everyday use, two dropdown controls appear on the ESPHome device page in Home Assistant. One changes the displayed information and the other rotates the screen. Both choices are saved on the ESP32, so they remain active after a power cut or restart.
Parts needed for the ESP32 Bluetooth proxy
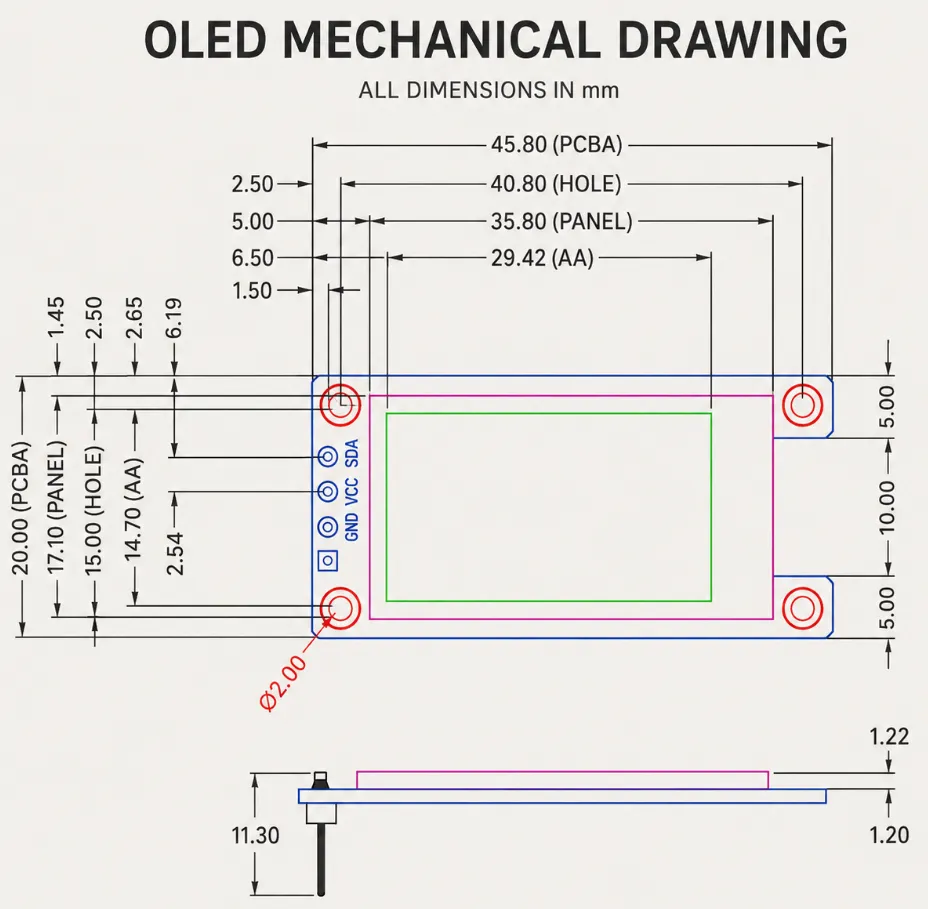
The supplied firmware and enclosure were tested with the exact parts below. Check the dimensions of your display before printing because many products sold as 1.3-inch OLED modules use different circuit boards, connectors, or mounting positions.
| Quantity | Part | Important details |
|---|---|---|
| 1 | ESP32 D1 Mini NodeMCU | ESP-WROOM-32, 4 MB flash, ESPHome esp32dev profile |
| 1 | ZJY130I0400WG41 OLED | 1.29 inch, 128 x 64, CH1115, I2C address 0x3C |
| 4 | Dupont jumper wires | Female-to-female or female-to-male to match your headers |
| 1 | USB power supply | Regulated 5 V supply rated for at least 1 A |
| 1 | USB data cable | Micro-USB or USB-C to match your ESP32 revision |
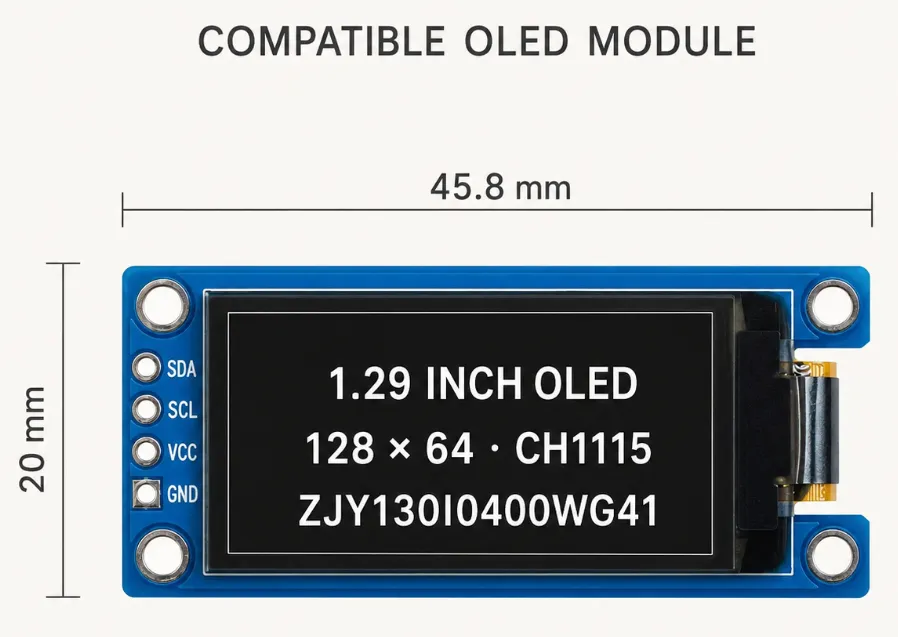
For the physical build, the compatible module measures 20 x 45.8 x 2.7 mm and uses a single-row 2.54 mm connector. The pin order is GND, VCC, SCL, SDA. The display has a CH1115 controller, while ESPHome drives it through the SH1106 128x64 compatibility mode used in the supplied configuration.
Print the ESP32 Bluetooth proxy enclosure
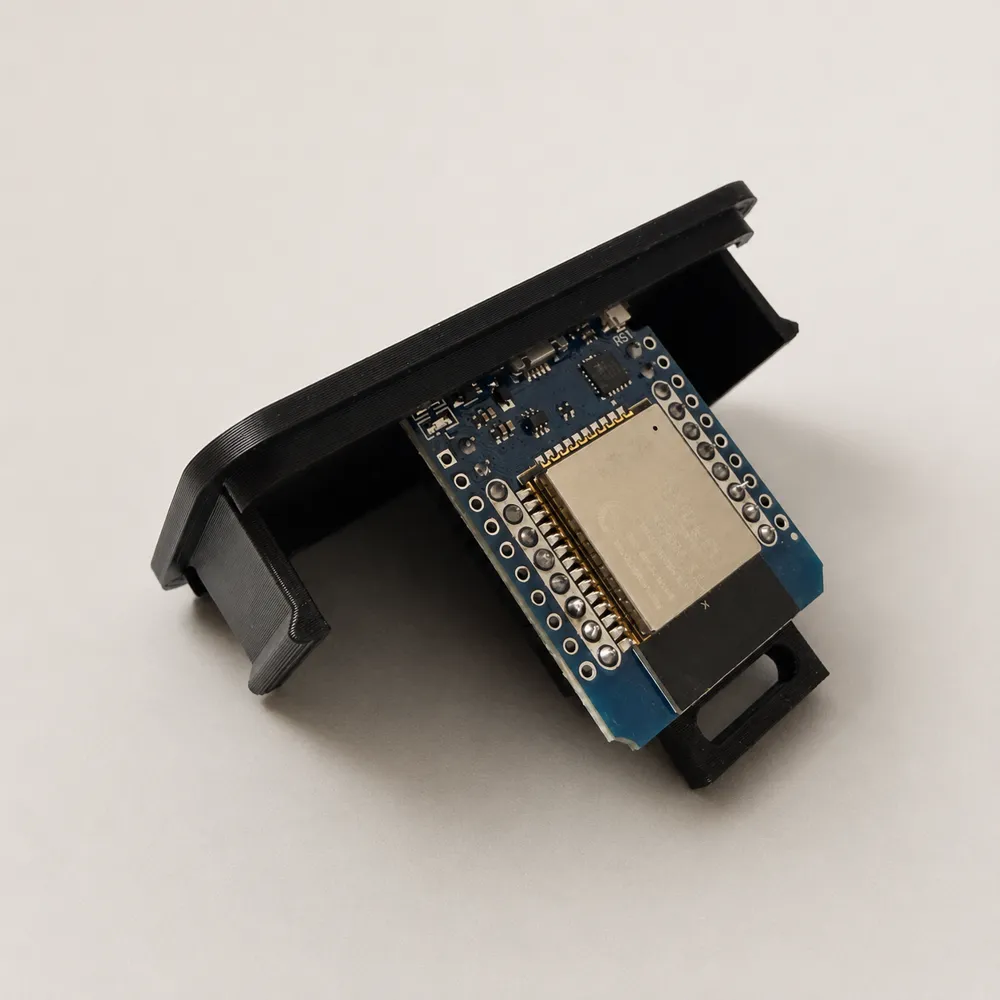
The printable model has a main body with integrated feet and a removable front panel. Printed clips retain the OLED without screws, while an internal mounting area holds the ESP32. The USB connector remains accessible after assembly.
Two print profiles are available on MakerWorld. Both use a 0.2 mm layer height, two walls, and 15 percent infill. The PLA profile takes about two hours, while the PETG profile takes about 2.7 hours. Each profile contains two plates for the enclosure body and front panel.
- Print the main body and front panel in your preferred material.
- Use a contrasting colour for the front panel if you want the OLED to stand out.
- Remove any fine stringing around the display clips and USB opening.
- Test-fit the OLED and ESP32 before connecting the wires.
Importantly, the MakerWorld model uses the MakerWorld Exclusive License. The printable files and the firmware have separate licenses. The ESPHome firmware is open source under the MIT License, while the printable enclosure follows the license shown on its MakerWorld page.
How the electronics fit inside
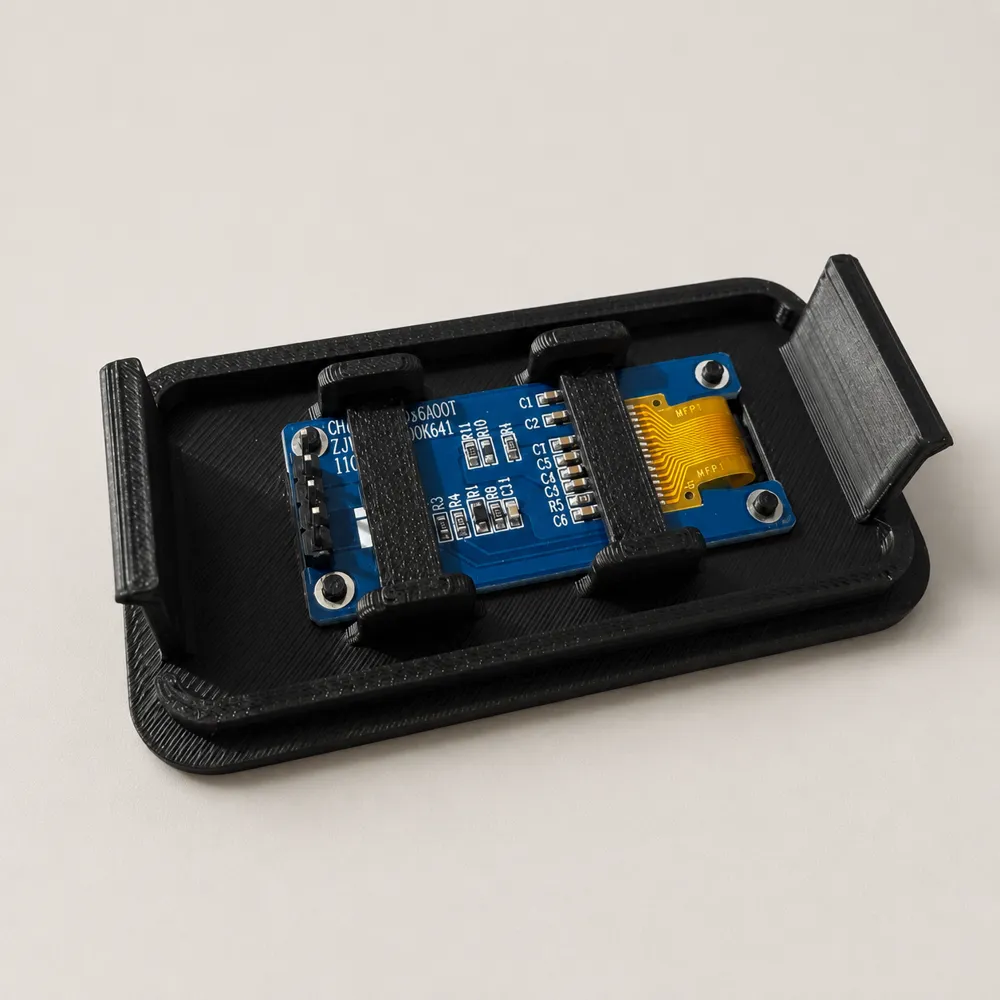
Wire the ESP32 Bluetooth proxy OLED
Disconnect USB power before connecting or changing any wire. Verify the labels on your exact OLED module instead of relying only on wire colours.
| OLED pin | ESP32 pin | Purpose |
|---|---|---|
| VCC | 3.3 V | Display power |
| GND | GND | Ground |
| SDA | GPIO21 | I2C data |
| SCL | GPIO22 | I2C clock |
Power the OLED from the ESP32 3.3 V pin unless the documentation supplied with your exact display clearly states otherwise. Reversing VCC and GND can damage the module.
Install the ESP32 Bluetooth proxy firmware
1. Download the project
Clone the repository and open its directory:
git clone https://github.com/WikiZell/ha-proxy-panel.git
cd ha-proxy-panel
2. Create a private secrets file
Copy the supplied example beside the firmware configuration:
cp firmware/secrets.example.yaml firmware/secrets.yamlOn Windows PowerShell, use:
Copy-Item firmware/secrets.example.yaml firmware/secrets.yamlReplace every sample value in firmware/secrets.yaml. Generate the Home Assistant API encryption key with:
openssl rand -base64 32Never publish or commit your secrets file. The repository already ignores it, but it is still worth checking before every commit.
3. Select the Home Assistant sensors
Open firmware/ha-proxy-panel.yaml and replace the two example entity IDs:
substitutions:
  temperature_entity: sensor.living_room_temperature
  humidity_entity: sensor.living_room_humidity
You can find entity IDs in Home Assistant under Settings > Devices & services > Entities. Choose entities that return numeric states. Values such as unknown and unavailable appear as dashes on the display.
4. Flash the ESP32 by USB
Install ESPHome on your computer, connect the ESP32 with a data-capable USB cable, and run the firmware:
python -m pip install esphome
esphome run firmware/ha-proxy-panel.yaml
Select the detected serial port when ESPHome asks. Windows ports usually look like COM10, while Linux commonly uses a path such as /dev/ttyUSB0. You can also copy the YAML and secrets into the ESPHome Device Builder add-on and choose Install > Plug into this computer.
5. Add the proxy to Home Assistant
After flashing, Home Assistant should discover the new ESPHome device automatically. Open Settings > Devices & services, select the discovered HA Proxy Panel, and enter the API encryption key when requested.
If discovery does not appear, add the ESPHome integration manually and enter ha-proxy-panel.local or the device IP address. The ESP32 and Home Assistant must be on networks that allow mDNS and TCP port 6053.
Assemble the ESP32 Bluetooth proxy enclosure
- Insert the OLED from behind the removable front panel.
- Slide it carefully beneath the integrated printed retaining clips.
- Place the ESP32 in its mounting area inside the enclosure.
- Connect VCC, GND, SDA, and SCL according to the wiring table.
- Route the jumper wires so they cannot be pinched by the front panel.
- Fit the front panel to the main body.
- Connect the USB cable and confirm that the display starts correctly.
Finally, do not force a display that does not fit beneath the clips. A small difference in PCB width or connector position can prevent a generic module from fitting, even when the product is advertised as 1.29 or 1.3 inches.
Use the ESP32 Bluetooth proxy in Home Assistant
The Display Content selector provides four views:
- Climate: temperature and humidity together.
- Temperature: a larger temperature value.
- Humidity: a larger humidity value.
- Proxy Status: Wi-Fi strength, IP address, and uptime.
The Display Rotation selector switches between Normal and Rotated 180. This is useful if your mounting position places the screen upside down. Changes take effect without reflashing.
Update the ESP32 Bluetooth proxy over Wi-Fi
After the initial USB installation, later versions can be installed over your local network:
esphome run firmware/ha-proxy-panel.yaml --device ha-proxy-panel.localThe ESPHome Device Builder also offers Install > Wirelessly. OTA updates are password protected using the value in your private secrets file.
Troubleshooting
The OLED remains black
- Check VCC and GND polarity.
- Confirm SDA connects to GPIO21 and SCL connects to GPIO22.
- Look for
Found device at address 0x3Cin the ESPHome logs. - Run an I2C scan. Scanning is enabled in the supplied configuration.
- Confirm that your controller is CH1115 or SH1106 compatible. An SSD1306 display needs the correct ESPHome model setting.
Climate values show dashes
Check that both configured entity IDs exist, have numeric values, and are available. The device also needs an active encrypted API connection to Home Assistant before it can receive those states.
Home Assistant cannot find the proxy
Check the Wi-Fi and API messages in ESPHome logs. If automatic discovery fails, add the device by IP address. Network isolation rules must allow the ESP32 to reach Home Assistant on TCP port 6053.
Download the project
The enclosure files are available from MakerWorld. The complete ESPHome configuration, safe secrets template, installation documentation, and issue tracker are in the HA Proxy Panel GitHub repository. There is also a compact project website and installation guide.
This ESP32 Bluetooth proxy for Home Assistant is an independent community project. It is not affiliated with or endorsed by Home Assistant, ESPHome, Nabu Casa, or their maintainers. If you build one, share a photo on MakerWorld. I would genuinely enjoy seeing how it looks in other setups.
If you enjoy practical printed electronics projects, you may also like my under-desk USB extension holder.